

Sky Album
Free FLV Player
DVD Photo Slideshow
Web Album Maker
Show Picture on TV
Web Slideshow
SWF Gallery
Photo Scroller
Flash Music
SWF Album
Web Flash
old homepages
Flash Album
Flash Images
Flash Photo
Flash Pictures
Flash Slide Show
Flash Slideshow
Myspace Flash Slideshow
Xanga Flash Slideshow
Flash Photo Gallery
Flash Photo Album
Flash Gallary
Flash Image Gallery
Photo Album Flash
Flash Photo Gallary
Myspace Slideshow Free
Flash Slideshow For Website
Flash Photo Gallery Scroll
Cool Slideshows
SlideshowZilla
Flash Banner Creator
Flash Slide Show Maker is a Flash album creator to make animated photo slide shows with SWF file as the output format. It transforms your digital photo collection to Macromedia Flash file format (SWF ) which you can share your memorable moments with your family or friends on your own homepage or website.
The following document provides you a brief introduction to the software and how to create a SWF slideshow from your photo collection.
Getting started
Creating projects in Flash Slideshow maker involves a three step workflow where you can organize and make your photo slideshow, set flash options and publish the flash slideshow.
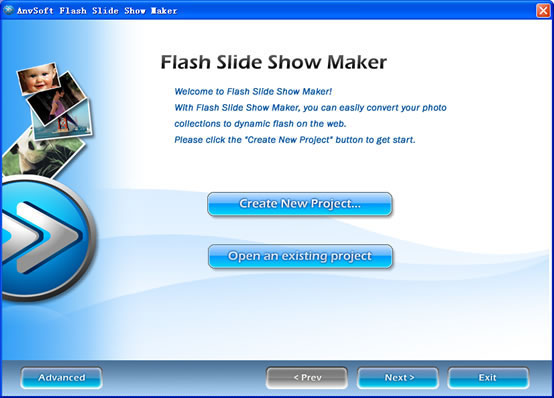
After running the Flash Slideshow maker, its main window appears as follows:
Create Slideshows
If you use the Flash Slideshow for the first time or you want to create a new project, you may click “Create New Album” button to enter the first step: organize and make slideshows, or you can click the “Open an Existing Project” to continue the creation based on your previous flash slideshow. The window of the “Create Slideshow” is as the following:
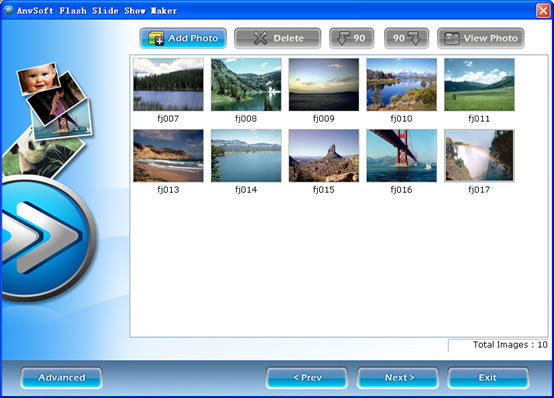
Figure 2: the window of Organizing and Making Slideshow
Slide Toolbar
Add Photo: to add photos to your slideshow
After clicking the “ Add Photo ” button, a pop-up window, in which list the accessible file folders in your computer, will appear as the following:

Figure 3: the pop-up window for the selection of photos
You can select photos from these folders. If you want to select only one photo in a folder, please click the thumbnail of the picture, after it selected, click “open”, and then it will appear in the slide panel. If you want to select several pictures at the same time, please press “Shift” or “Ctrl” while clicking the pictures.
Delete: to remove the selected photos in your slideshow
Select the photo you want to delete, and click the “delete”, and then the selected photo will be removed from your slideshow. Actually, the photo is just removed from the slideshow and the original image file is not removed. If you want to remove several photos at the same time, please press “Shift” or “Ctrl” while selecting the photos.
![]() and
and ![]() : to rotate the selected slide 90°counterclockwise or 90°clockwise.
: to rotate the selected slide 90°counterclockwise or 90°clockwise.
View Photo: to view the selected slide in large size
Select a slide, and then click the “View Photo” button, you can view the slide in large size. You can also see the large size of the slide by double-clicking the slide.
Customize the transition effects of the slide
Double click the thumbnail of the slide or click the “View Photo” button, and then you can view the slide in large size. Then at the bottom of the slide, you can customize the transition effect of the individual slide by selecting a type of effect provided by the software. More than 40 transition effects are available now.
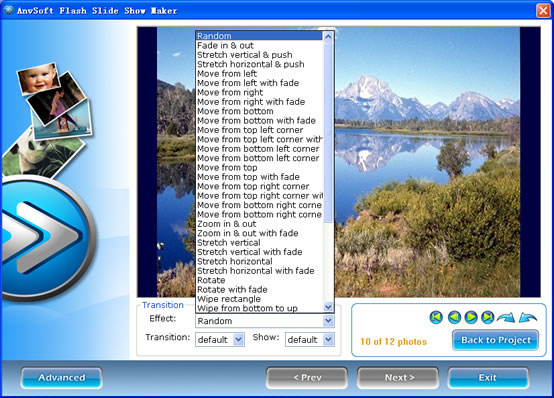
Figure 4: the window of “customize the effect transition”
Slide Panel: to display the thumbnails of the selected pictures
The thumbnails of the photos you have selected will be displayed in this area
Notes: You can select photos from your file folder in your computer. These formats, including JPEG, TIFF, Bitmap and PNG, are supported by the software.
Advanced: click here and you will see a pop-up menu as follows:
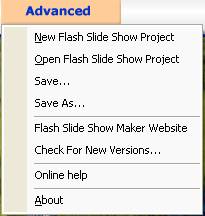
New Flash Slide Show Project: to create a new project by selecting this option
Open Flash Slide Show : to open an existing flash slideshow file in your computer
Save/Save as: to save the flash slideshow file you have created in a file folder
Flash Slide Show Maker Website: to enter the Flash Slideshow Website directly by selecting the option
Check for New Versions: to check whether the software has been updated by a new version
Online Help: to get instant help by consulting on line
About: to know the details about the Flash Slideshow Maker
Exit: to exit from the current program
Set Flash Options
After you finish the organization of your slideshow, you can click ![]() button at the bottom of the window and enter the next step: Set Flash Options. The window is illustrated as the following:
button at the bottom of the window and enter the next step: Set Flash Options. The window is illustrated as the following:
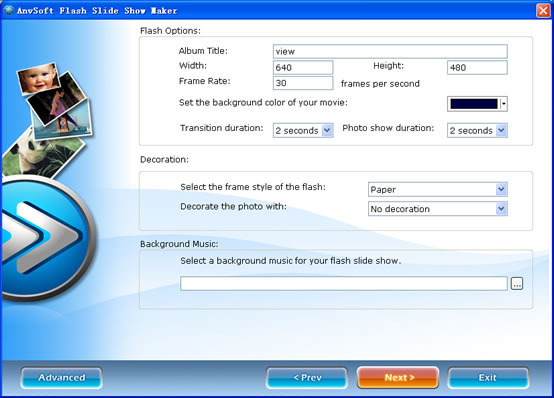
Figure 5: the window of the “Set Flash Options”
Flash Options: to set the relating parameters of the flash, including Album Title, Width, Height, Frame Rate, background color of the flash and the transition duration.
Player Theme: to select a theme for your flash player. The theme will decide the appearance of your flash player when you play your SWF file. Several options are provided for your selection, such as paper, heart and cool, etc.
Figure 7: the pop-up window for selection of the background music
You can select your favorite music and then click “open” button, and it will be added to your flash slideshow and the file path will be displayed in the blank. By now, the file formats such as MP3, WMA and WAV are supported by the software.
Publish the Flash Slideshow
After finishing the settings of the flash options, you can click the “Next” button to enter the third step: Publish the Flash File
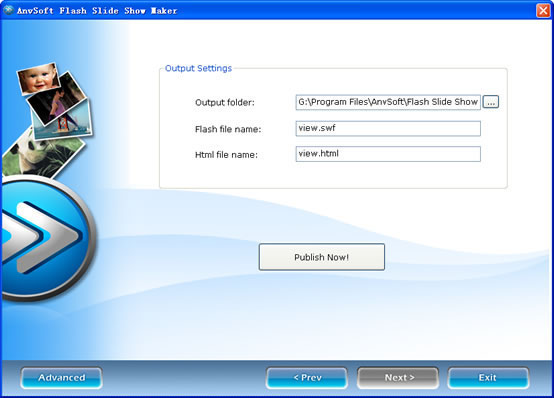
Figure 8: the window of the “publish flash file”
In this window, you can select the path to save the files, including flash file and html file, and enter the file names. After you finishing the setting, please click the “Publish Now” button and your slideshow will be published to and saved in the appointed address.
Notes: During these three steps, you can go back to the previous step by clicking the ![]() button and make any changes as you like.
button and make any changes as you like.